Kentucky Housing Corporation (KHC) created an electronic funding application system that will be used to request funding from most programs administered by the corporation.

It is recommended that you use Internet Explorer 9 or above, the latest version of Firefox or Chrome when completing your application.

Profile Questions

   
Expand How Do I Create a User Account?
Expand How Do I Update My Profile?
Expand What If I Can't Remember My Password?

Team Questions

Teams are used to create a group of people that create and manage applications for your organization.

   
Expand Is There a Limit To The Number Of Teams I Can Have?
Expand Is There a Limit To The Number Of Users I Can Place On a Team?
Expand Is There a Limit To The Number Of Teams I Can Be On?
Expand How Do I Create A Team?
Expand How Do I Add a Member
Expand Remove a Team Member
Expand Change a Team Member Access
Expand What Are Special Permissions?

Document Related Questions

   
Expand What Document Types Am I Allowed To Upload?
Expand What Is the Maximum File Size I'm Allowed To Upload?
Expand 
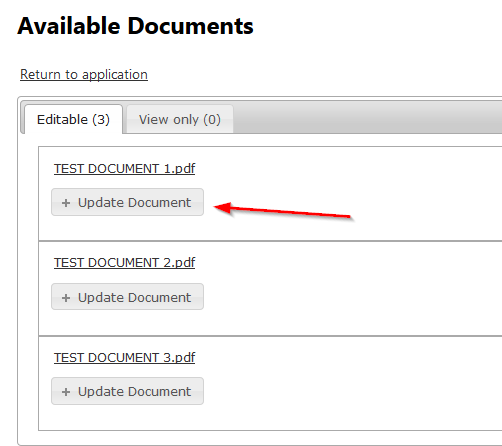
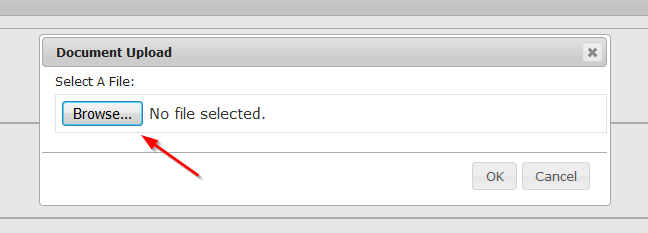
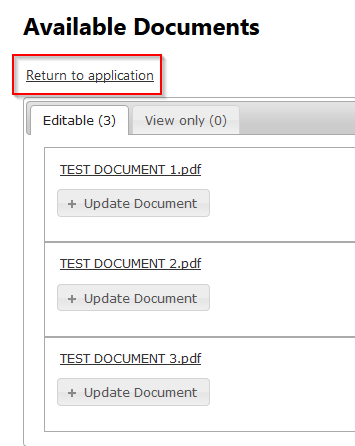
How do I view and/or update documents shared by KHC?

Document Repository Questions

Documents added to the document repository can be attached to any application by a team member. This can be used for documents that can be attached to multiple applications.
   
Expand How Do I Add Documents To The Document Repository?
Expand How Do I Remove Documents From The Document Repository?

Subscription Questions

Subscriptions are used to access the various funding products offered by Kentucky Housing Corporation.

All funding types will be listed and the status of your company's access.

To request access to funding subscriptions you currently are not approved for, check the appropriate box and click 'Save'.

Application Questions

   
Expand How Do I Create A New Application?
Expand How Do I Rename An Application?
Expand How Do I Delete An Application?
Expand Request to Recall an Application:
Expand Print Application Functions:
Expand Additional Application Information:

Fees

How do I pay my application fees?
  1. Select the application that have fees owed.
  2. Click the "Pay Fees" button.
  3. Enter the amount due.
  4. Click "Pay Now" to continue.
  5. Review the billing information.
    1. Update the address if necessary.
    2. A phone number is required.
  6. Enter the ACH Bank Information.
  7. Click "Submit Payment" to submit the payment information.
  8. After the information is submitted securely to PNC Bank a payment summary will appear.
  9. You should also receive an email with a payment summary and confirmation number.

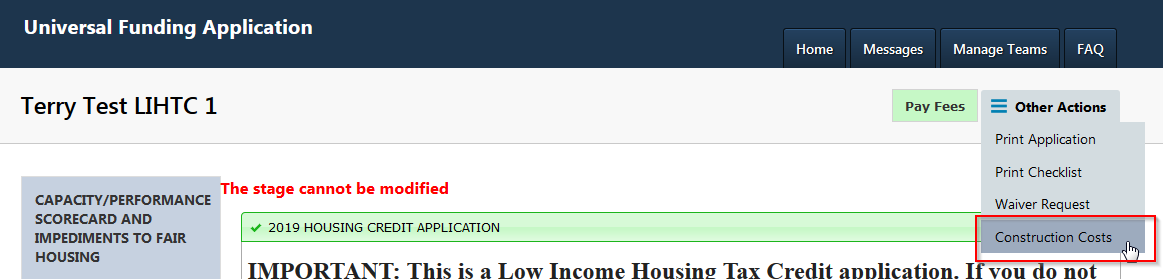
Adding Construction Costs in UFA

  1. Log into the UFA system and select the application to which you need to add Construction Costs.
  2. Click on the Other Actions menu in the right-hand corner. Select Construction Costs.
    FAQ_ConstructionCosts_1


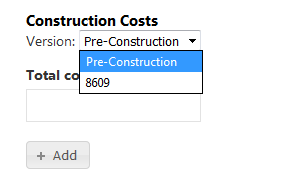
  3. In the Version drop down box, select if you are submitting construction costs at Pre-Construction or 8609.

    • At Pre-Construction enter the total from the Final Cost Estimate form.
    • At 8609 enter the total from the Final Cost Certification form.
    FAQ_ConstructionCosts_2


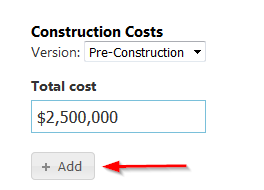
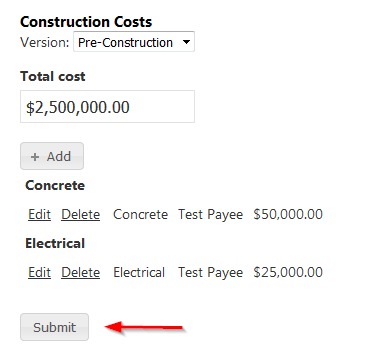
  4. Enter the Total cost (Total construction costs), then click on the Add button.
    FAQ_ConstructionCosts_3


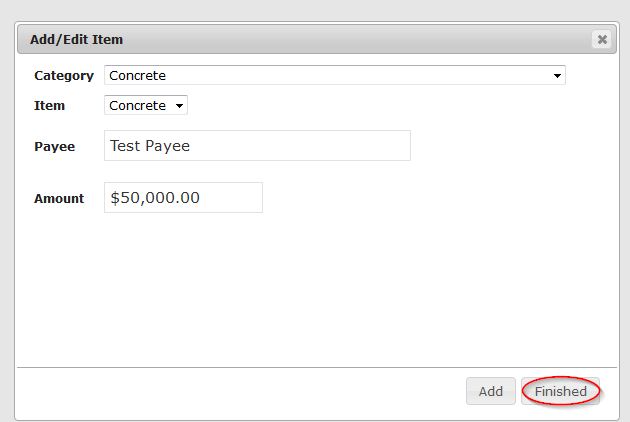
  5. In the Add/Edit window, select the Category from the drop down box, the Item will default to the category selected. Enter the Payee and the Amount. Click the Add button.
    FAQ_ConstructionCosts_4


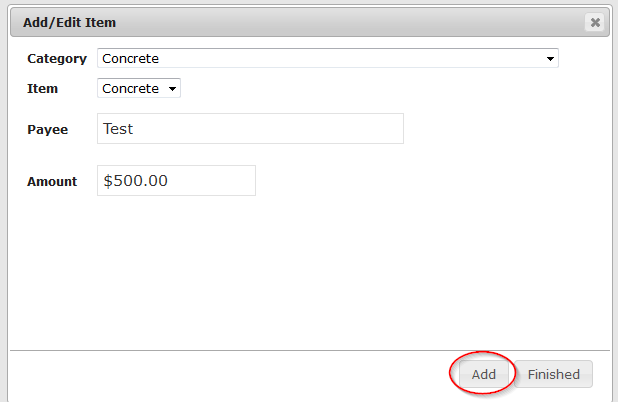
  6. Enter all construction costs. When completed click the Finished button.
    FAQ_ConstructionCosts_5


  7. The list of items entered will be listed by category. When all costs have been entered, click the Submit button.
    FAQ_ConstructionCosts_6


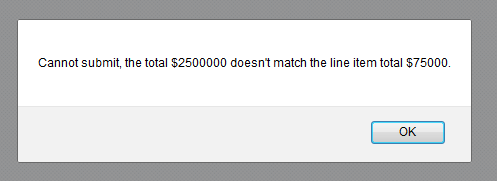
  8. The sum of itemized costs entered, must match the Total Cost amount entered before it can be submitted. If they do not match, you will not be able to submit and the following message will be shown.
    FAQ_ConstructionCosts_7


All users are required to create an account before an application can be completed. This account can be used to submit an application to Housing Production Management, Multifamily Finance, or Specialized Housing Resources. Before you can begin creating applications at least one "Admin" user must be approved by Kentucky Housing Corporation staff for your organization. An email is sent to you once approved.
  1. Click Register
  2. Enter your Company Name
  3. Enter your First Name
  4. Enter your Last Name
  5. Enter a User Name
  6. Enter your Email Address
  7. Enter your Title
  8. Enter a Password
  9. Enter the same password from prior step in 'Confirm password'
  10. Select the response to question
    • Select 'Admin' from dropdown box if you will maintain all users for your company
    • Select 'User' from the dropdown box if you will NOT maintain users for the company
  11. Review the policy
  12. Check the box if you agree with the policy
  13. Click 'Register' only if you agree with the policy in step 12
  14. Once you register, you can log into the Universal Funding Application
  1. Click 'Edit Profile'
  2. Change your information
  3. Click 'Save Profile Changes'
Kentucky Housing Corporation staff do not have access to passwords. To reset your password:
  1. Visit the Password Reset page
  2. Enter the user name used to create your registration
  3. Enter the email address associated with the user name
  4. Click 'Request New Password'
  5. You will receive an email with instructions to reset your password
You are allowed to have as many teams as you would like. Each team can have as many users as you would like. There is no limit on the number of teams a user can be apart of.
In order to create a team, you must be the Company Administrator.

  • Click 'Manage Teams'
  • Click 'Add A New Team'
  • Enter a Team Name
  • Check the box for the product or products you would like this team to use
  • Click 'Save'
In order to add a team member, you must be the Company Administrator or a Team Leader, and the person you are adding must be a registered user.
  1. Click 'Manage Teams'
  2. Expand the team by clicking the plus icon
  3. Click 'Add A New Team Member'
  4. Type the user's name (Firstname, Lastname, or User name)
  5. Select the correct user from the autocomplete list
  6. Select the role from the dropdown box
    1. Administrator
      1. Has access to all functions
    2. Team Leader
      1. Cannot change team information, but can manage all application functions
    3. Team Member
      1. Limited to some application functions
  7. Apply special permissions if applicable
  8. Click 'Save'
In order to remove a team member, you must be the Company Administrator or a Team Leader.
  1. Click 'Manage Teams'
  2. Open the team by clicking the plus icon
  3. Click the delete icon to remove the user from the team
  4. Click 'Remove User' on the dialog box
In order to change a team member's role you must be the Company Administrator or a Team Leader.
  1. Click 'Manage Teams'
  2. Open the team by clicking the plus icon
  3. Click the dropdown next to the individual
  4. Select the new access level
Currently, UFA allows documents with the following extensions:
  • .txt
  • .doc
  • .docx
  • .xls
  • .xlsx
  • .gif
  • .jpg
  • .jpeg
  • .png
  • .pdf
  • .tiff
  • .tif
  • .rtf
Currently, UFA limits the size of file uploads to 150MB.
  1. Open the application that has documents shared by KHC.
  2. If documents are shared, you will see an "Available Documents" button at the top of the application.

    FAQ_DocShareFeature_1
  3. On the Available Documents page, you will see two tabs. One is for documents that can be edited, and the other is for documents you can view only. If editing, you will click on the Update Document button to upload a revised document. (The list will show you the name of the original document uploaded.)

    FAQ_DocShareFeature_2
  4. When you click the Update Document button, you will then click on Browse to search for your document saved on your computer.

    FAQ_DocShareFeature_3
  5. When you are finished, click the "Return to application" link.

    FAQ_DocShareFeature_4
You can only add a document to the repository if you are a Company Administrator.
  1. Click 'Document Repository'
  2. Click 'Add New Document'
  3. Click 'Browse' to locate file
  4. Click 'Open'
  5. Optionally check the 'Private Document?' box
    • If checked, the document will only be viewable by select KHC Staff. The application preparer will be able to add the document to an application, but will not be able to view the contents of the document.
  6. Optionally enter an 'Expiration Date'
    • If entered, a warning will be presented when the document is nearing expiration.
You can only remove a document from the repository if you are a Company Administrator.
  1. Click 'Document Repository'
  2. Click the delete icon next to the document you wish to remove
  3. Click 'Yes' to confirm you wish to delete the document
  • If a document is used in an application, removing it from the repository WILL NOT remove it from any application it was added to.
In order to create an application, you must be a member of a team and have the appropriate permissions applied.
  1. On the 'Home' page, select the tab for the appropriate application type
  2. Click 'Create New Application'
  3. If asked to 'Select A Team'
    • This is the team that will be associated with the application
    1. Select the appropriate team
    2. Click 'Next'
  4. If asked to 'Select A Funding Round'
    • This is the funding round you are creating an application for
    1. Select the appropriate funding round
    2. Click 'Next'
  5. The next step only applies to some funding programs.
    • Click the application type you want to create
    • Click 'Next'
  6. If prompted 'Do You Want To Copy From Another Application', choose one of the following:
    • Yes
      1. Select the application you wish to Copy
      2. Click Next
    • No
  7. Enter a name for the project
  8. Click 'Create Application'
  1. Click the plus icon to open the application information panel
  2. Click note icon 
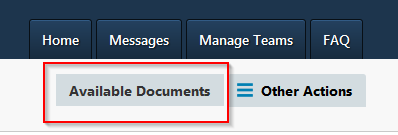
for the application to be renamed
  3. Edit the project title
  4. Click
    1. 'Rename Application' to save change
    2. 'Cancel' will not save the change
You must be given appropriate permissions on the team before being able to delete an application.
  1. Click delete icon for the application to be deleted
  2. Confirm the deletion by clicking 'Delete Application'
    • Once deleted, it cannot be undone
Use this function to make changes to an application that has been submitted. The "Request Recall" function is only available while the funding round is in progress; applications may not be recalled after the application submission deadline has passed.
  1. Click the "Request Recall" button.
  2. A message will appear when the recall is requested notifying you the request may take several minutes.
  3. You will need to refresh, or exit and return to the application to see the recall has been completed. Once completed, you may edit the application.
  4. After making your desired changes, follow the steps above to Submit an Application.
  1. Click "Print Application" to create a PDF file for your records.
  2. Click "Print Checklist" to show the items that are required to be uploaded to the application.
  • All fields marked with a red asterisk are required fields and must contain a value in order for the application to be submitted.
  • If a required field or question is not applicable to your project, you may click the "N/A" button.
  • For numeric fields that are not applicable to your project, enter a zero.
  • It is advised that as you complete each section that you click the "save" button to ensure that information entered is not lost before you move to the next section.
When adding a user to a team, you can apply special permissions to that user for that team, as defined below.

Add Team Leaders Can add users under the role "Team Leader" to the team.
Edit Team Leaders Can edit users with the role of "Team Leader" on the team.
Remove Team Leaders Can remove users with the role of "Team Leader" from the team.
Add Team Members Can add users under the role "Team Member" to the team.
Edit Team Members Can edit users with the role of "Team Member" on the team.
Remove Team Members Can remove users with the role of "Team Member" from the team.
Add Team Administrators Can add users under the role "Team Administrator" to the team.
Edit Team Administrators Can edit users with the role of "Team Administrator" on the team.
Remove Team Administrators Can remove users with the role of "Team Administrator" from the team.
Create Applications Can create new applications for the team.
View Applications Can view applications created by the team.
Modify Applications Can modify applications created by the team.
Delete Applications Can delete applications created by the team.
Submit/Recall Applications Can submit applications created by the team.
Can recall submitted applications created by the team.
Submit Additional Phases Can submit phases indicted as an additional phase.